
Tigshop 使用文档
Stripe 支付接入与配置
Stripe 支付接入与配置(Tigshop)
本文档用于指导在 Tigshop 中启用 Stripe 支付:从注册账号、获取密钥、后台配置,到创建 Webhook 并完成联调验证。以操作步骤为主。
1. 准备工作
1.1 你需要准备的域名/接口
Tigshop Stripe 回调使用以下地址(系统已提供):
- 支付回调(同时也包含了退款回调)(Stripe 专用,读取原始请求体用于验签):
POST /api/order/pay/notify/stripe - 退款回调(统一回调入口):
POST /api/order/pay/refundNotify/stripe
你需要确保:
- 外网可访问(Stripe 服务器要能回调到你的接口)
- HTTPS 推荐(生产环境建议必须 HTTPS)
- 若有网关/反向代理,确保不会改写请求体(否则验签可能失败)
说明:支付回调之所以是
/notify/stripe,是因为该接口会读取 原始请求体 来验签(避免 Map 反序列化导致验签失败)。
1.2 区分 Test Mode / Live Mode(非常重要)
Stripe 的 测试模式 与 正式模式 的 Key、Webhook Secret、事件触发都是独立的:
pk_test_.../sk_test_.../whsec_...(测试)pk_live_.../sk_live_.../whsec_...(正式)
请保证你在 Tigshop 后台配置的 Key 与 Stripe Dashboard 当前模式一致。
2. 注册 Stripe 账号
- 打开 Stripe Dashboard 并注册账号(企业建议使用公司邮箱)。
- 完成邮箱验证并登录。
- 建议先在 Test mode(测试模式) 完成联调,再切换到 Live mode 上线。
3. 获取 Stripe API Keys(公钥/密钥)
- Stripe Dashboard 左侧进入:Developers → API keys
- 复制以下两项:
- Publishable key:
pk_test_...或pk_live_... - Secret key:
sk_test_...或sk_live_...
- Publishable key:
在 Tigshop 后台对应配置:
stripePublishableKey= Publishable key(pk_...)stripeSecretKey= Secret key(sk_...)
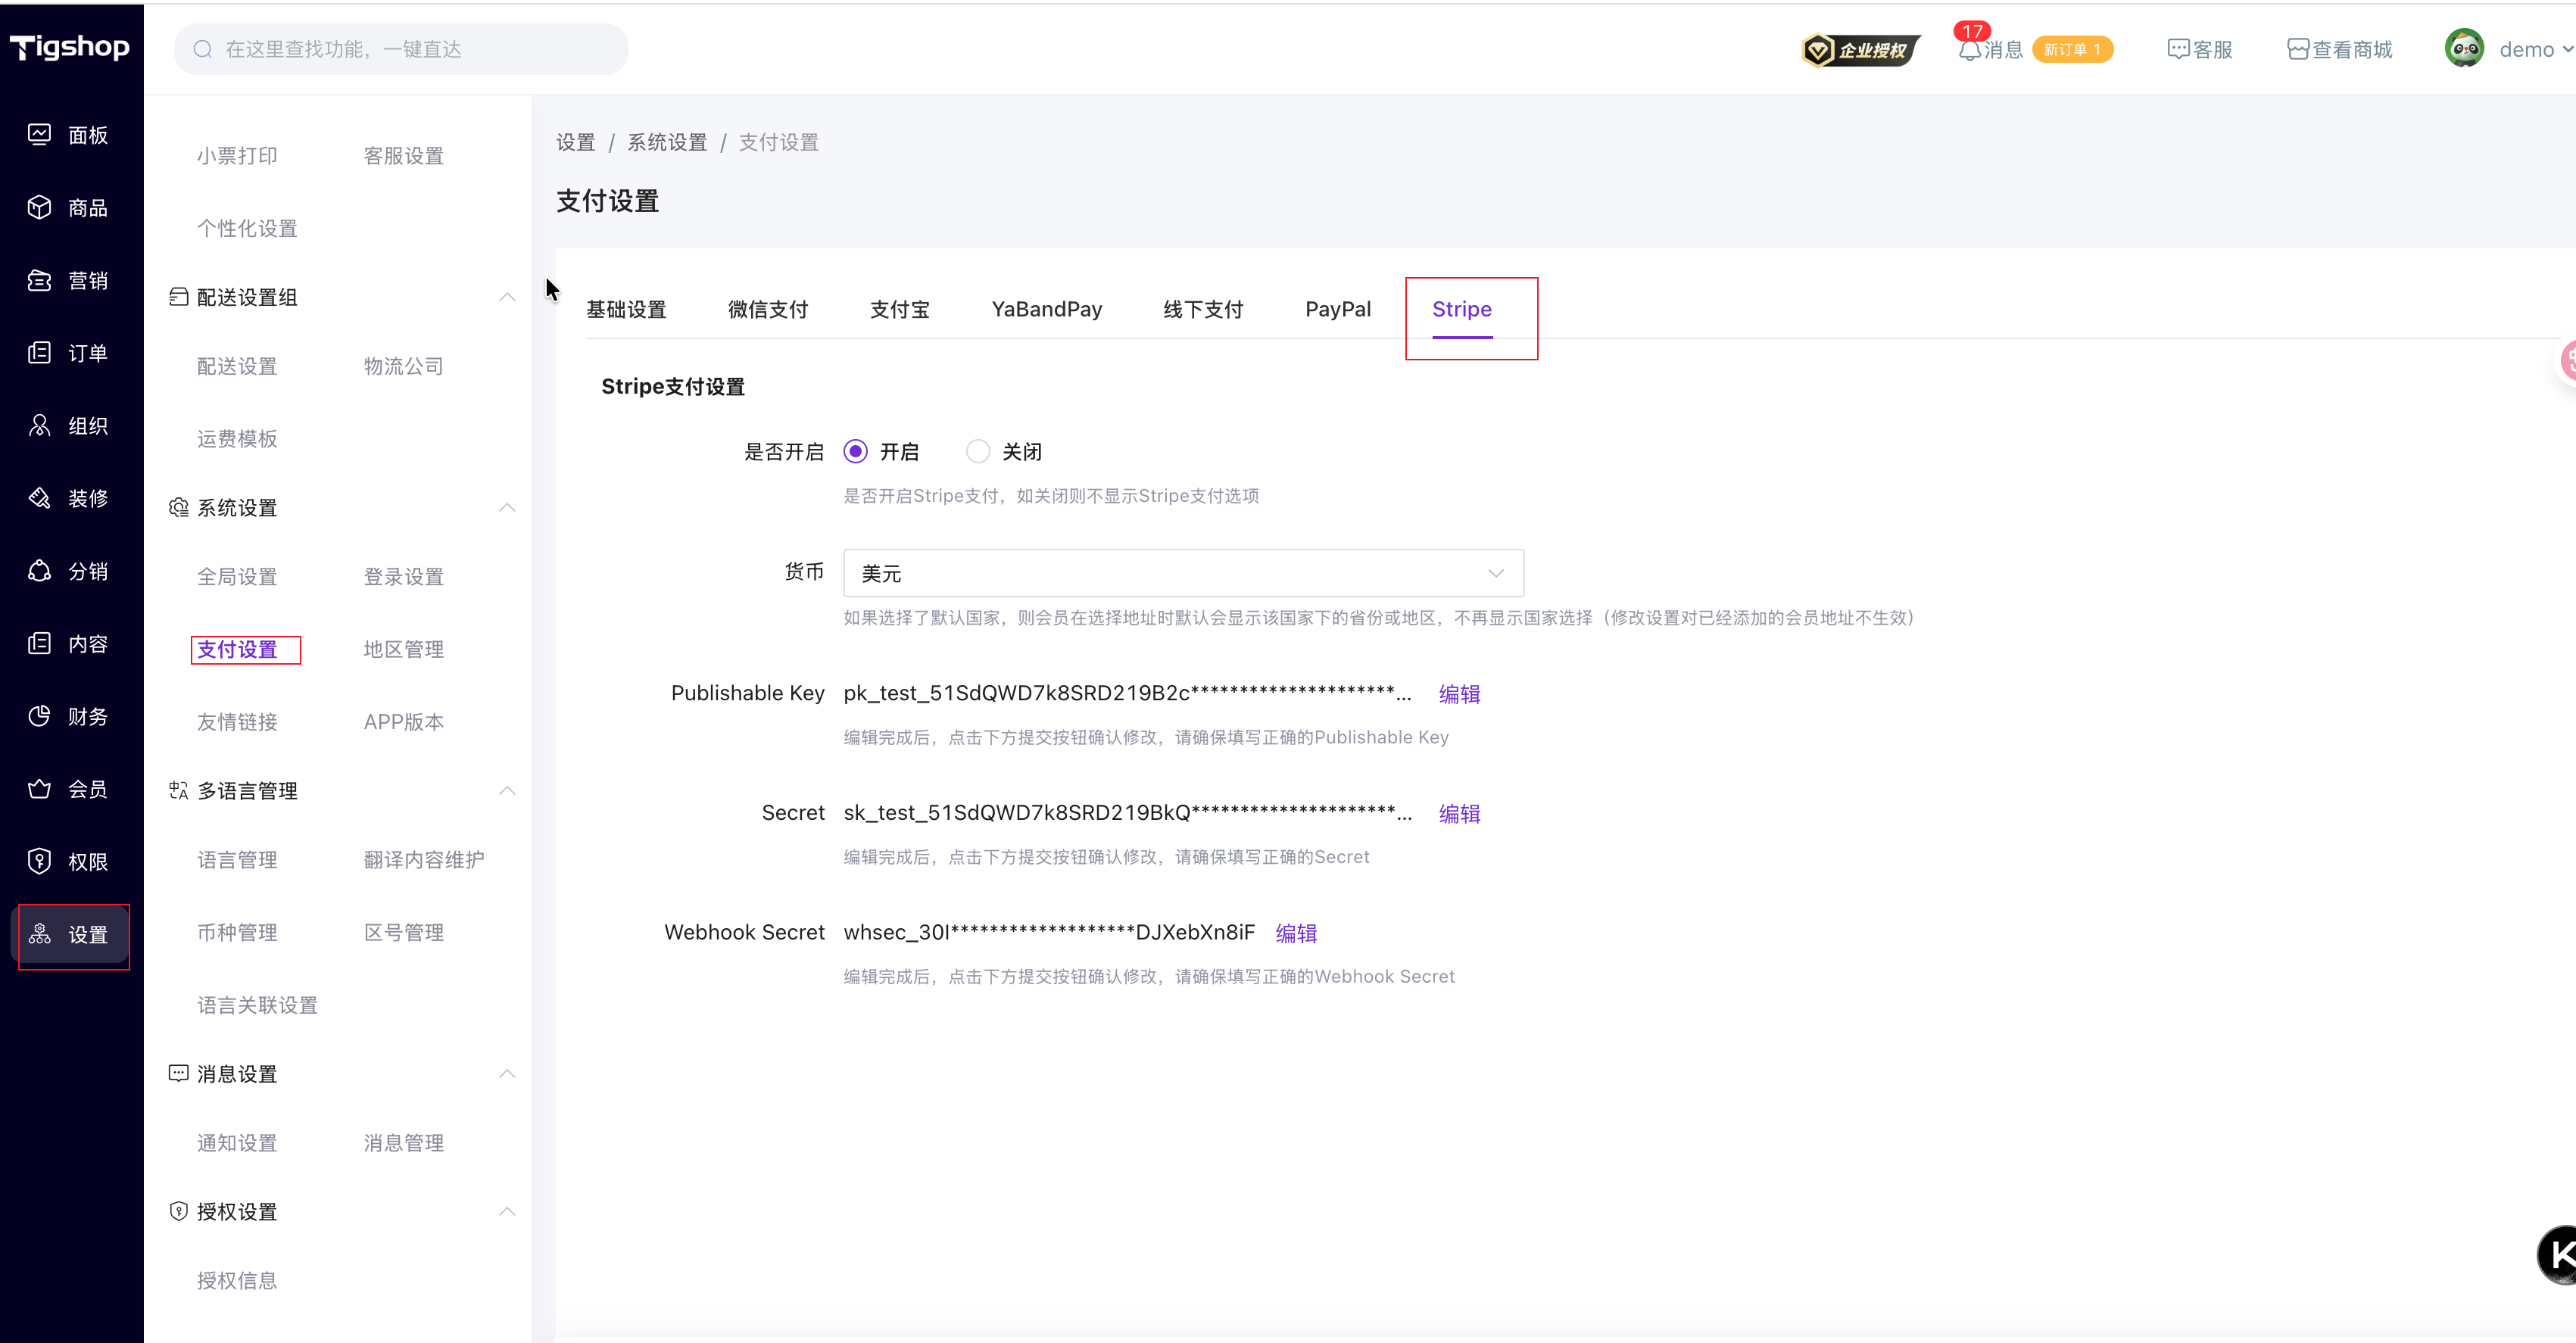
4. 在 Tigshop 后台配置 Stripe
后台界面设置路径:
后台接口(管理端)对应:
- 查询:
GET /adminapi/setting/config/stripeSettings - 保存:
POST /adminapi/setting/config/saveStripe
需要配置的关键项(与系统字段一一对应):
- 启用开关
useStripe:1开启 /0关闭
- 币种
stripeCurrency:如usd、eur、jpy等(小写)stripeCurrencyList:后台下拉可选币种列表(系统维护)
- Key
stripeSecretKey:sk_test_.../sk_live_...stripePublishableKey:pk_test_.../pk_live_...
- Webhook 验签密钥
stripeWebhookSecret:whsec_...
备注:后台查询返回时会对敏感字段做脱敏显示,这是正常现象。
5. 创建 Webhook(用于支付/退款结果通知)
5.1 新增 Webhook Endpoint
- Stripe Dashboard 左侧进入:Developers → Webhooks
- 点击:Add endpoint
- 填写 Endpoint URL(按你的域名拼接):
- 支付回调:
https://你的域名/api/order/pay/notify/stripe - 退款回调:
https://你的域名/api/order/pay/refundNotify/stripe
- 支付回调:
建议:支付与退款可以分别建两个 Endpoint(更清晰),也可以统一建一个 Endpoint 并同时勾选事件;但本项目支付回调使用
/notify/stripe以保证验签稳定。
5.2 选择需要监听的事件(Events)
建议至少勾选:
- 支付成功:
payment_intent.succeeded
退款相关建议勾选(根据你们业务):
charge.refundedrefund.updated(或charge.refund.updated,按你们 Stripe 版本/习惯选择)
5.3 获取 Webhook Signing Secret(whsec_)
保存 Endpoint 后,在该 Endpoint 详情中找到:
- Signing secret:形如
whsec_...
复制到 Tigshop 后台配置:
stripeWebhookSecret=whsec_...
6. 联调验证(推荐流程)
6.1 验证支付创建是否成功
- 前台下单,选择 Stripe 支付
- 系统会返回一个 Stripe Checkout 的跳转链接(前端会跳转到 Stripe 支付页)
- 在 Stripe 支付页完成测试支付(Test mode 使用测试卡/测试支付方式)
6.2 验证 Webhook 是否收到回调
在 Stripe Dashboard:Developers → Webhooks → 进入你的 Endpoint
- 观察 Recent deliveries:
- 是否有
200(或系统返回 SUCCESS) - 是否有失败重试
- 失败时查看 request/response 与错误信息
- 是否有
6.3 常见验签失败排查(重点)
如果你看到类似错误:No signatures found matching the expected signature for payload,常见原因:
stripeWebhookSecret配错(Test/Live 混用、复制错 endpoint 的 whsec)- 请求头
Stripe-Signature未传到后端(代理/网关丢了 header) - 请求体被中间层改写(格式变化导致签名不匹配)
- 回调 URL 配错(打到了非 stripe 专用回调
/notify/stripe)
排查建议:
- 确认 Stripe Endpoint 的 Signing secret 与后台配置一致
- 确认回调命中的是:
/api/order/pay/notify/stripe - 确认网关保留
Stripe-Signature请求头且不改写 body
7. 上线注意事项(Live mode)
- Stripe Dashboard 切换到 Live mode
- 重新获取:
pk_live_...sk_live_...
- 重新创建(或切换)Webhook Endpoint,并获取新的:
whsec_...
- 在 Tigshop 后台替换为 Live 的配置,并开启:
useStripe = 1
- 进行一笔真实金额的小额支付验证(按公司流程)。
 赣公网安备36010902001041号
大纲
Stripe 支付接入与配置(Tigshop)
1. 准备工作
1.1 你需要准备的域名/接口
1.2 区分 Test Mode / Live Mode(非常重要)
2. 注册 Stripe 账号
3. 获取 Stripe API Keys(公钥/密钥)
4. 在 Tigshop 后台配置 Stripe
5. 创建 Webhook(用于支付/退款结果通知)
5.1 新增 Webhook Endpoint
5.2 选择需要监听的事件(Events)
5.3 获取 Webhook Signing Secret(whsec_)
6. 联调验证(推荐流程)
6.1 验证支付创建是否成功
6.2 验证 Webhook 是否收到回调
6.3 常见验签失败排查(重点)
7. 上线注意事项(Live mode)